Final Project
After completing the Fab Lab course and learning all the necessary skills, we were given two weeks to come up with and create an electronic project. I decided to focus on smart home automation using Wi-Fi-connected devices.
Smart Home Automation
prupose
The purpose of this project is to create a smart room automation system that uses Wi-Fi-enabled devices to control various elements in a room, such as lighting, curtains, and displays, providing enhanced convenience and control through a connected environment.
Problem solving
This project addresses the following issues:
- Manual Control Inconvenience: Automates tasks like lighting and curtain control for easier management.
- Energy Waste: Optimizes energy usage by automating device settings based on occupancy and schedules.
- Lack of Personalization: Allows users to customize settings (lighting, temperature, etc.) for comfort and convenience.
- Fragmented Control: Integrates multiple devices into a single system for unified control.
- Limited Accessibility: Provides remote or voice control, aiding users with mobility challenges.
- Security Risks: Enhances home security by simulating occupancy when the user is away.
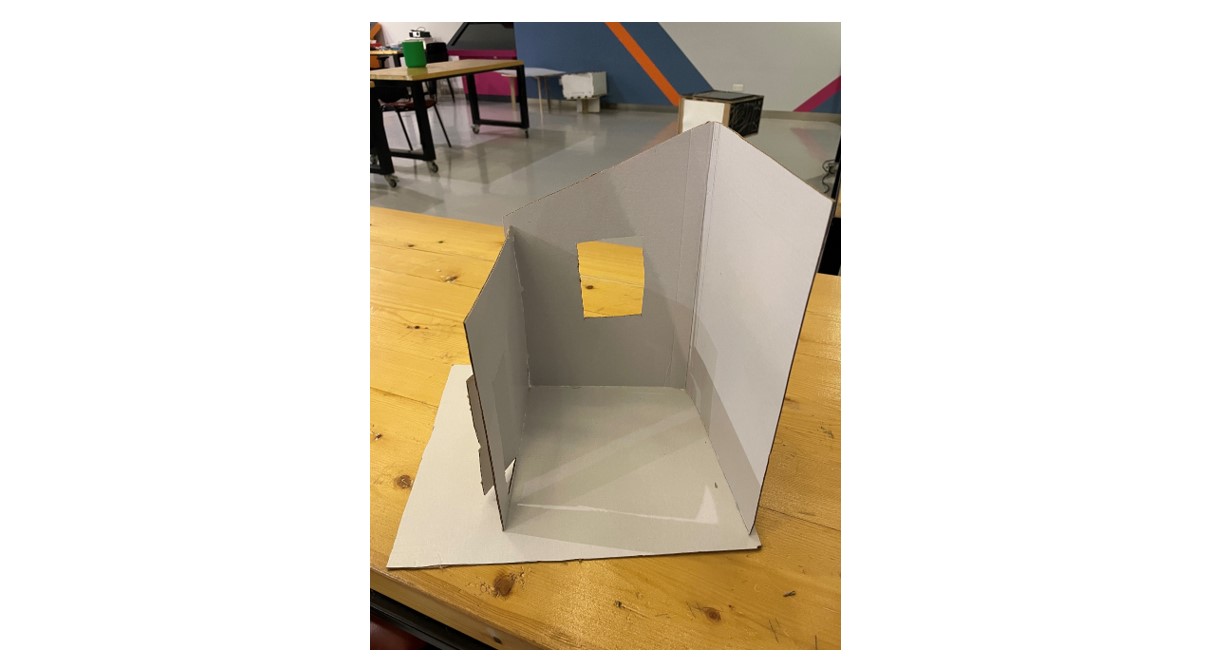
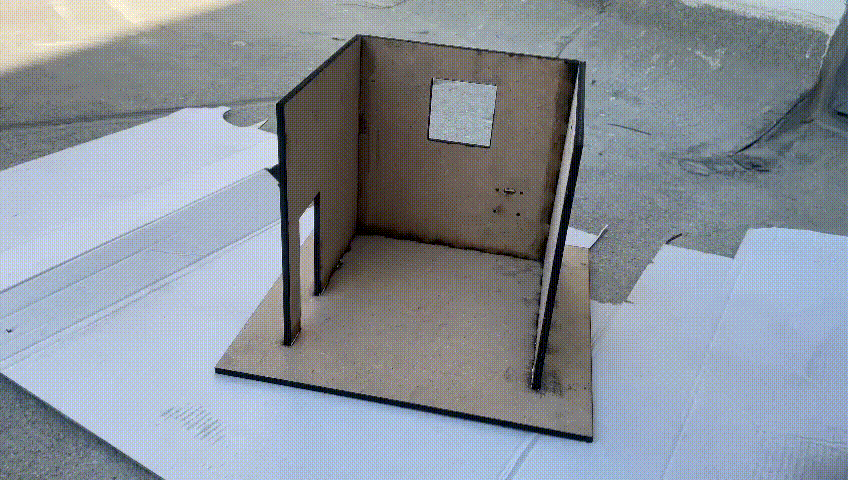
prototype
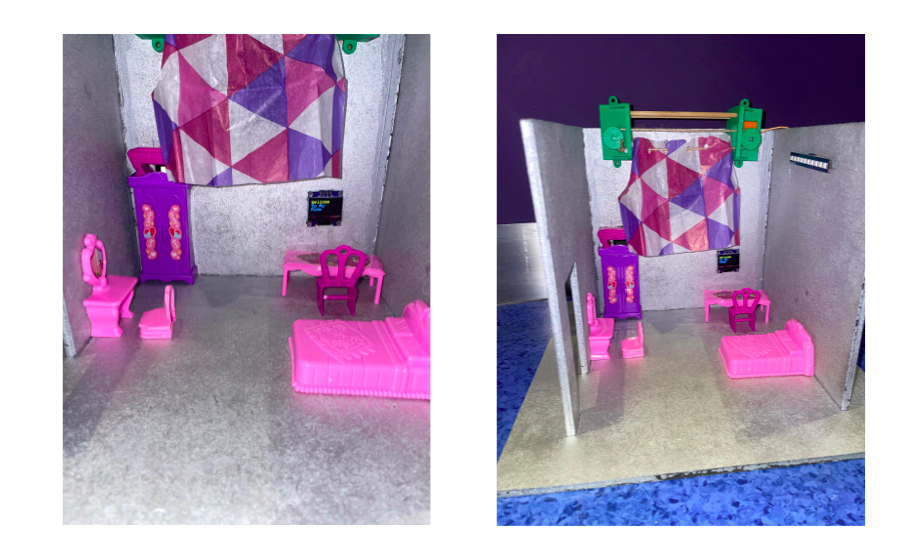
To begin the design process, I first created a prototype of the room layout to visualize and test the concept before building the final model. I used cardboard to cut and adjust the dimensions of the room’s walls, ensuring they were proportionate to the electronics and components I planned to integrate. The pieces were assembled using a hot glue gun, allowing me to quickly assess the fit and functionality of the design.
Process and steps
In this project we will design two main components: first, a room model with electronic devices controlled by a single microcontroller, and second, a remote device with another microcontroller that communicates with the room microcontroller via Wi-Fi (IoT). Given the short timeline, I collaborated with my friend Khalid. I decided to work on the room model, while he handled the remote device.
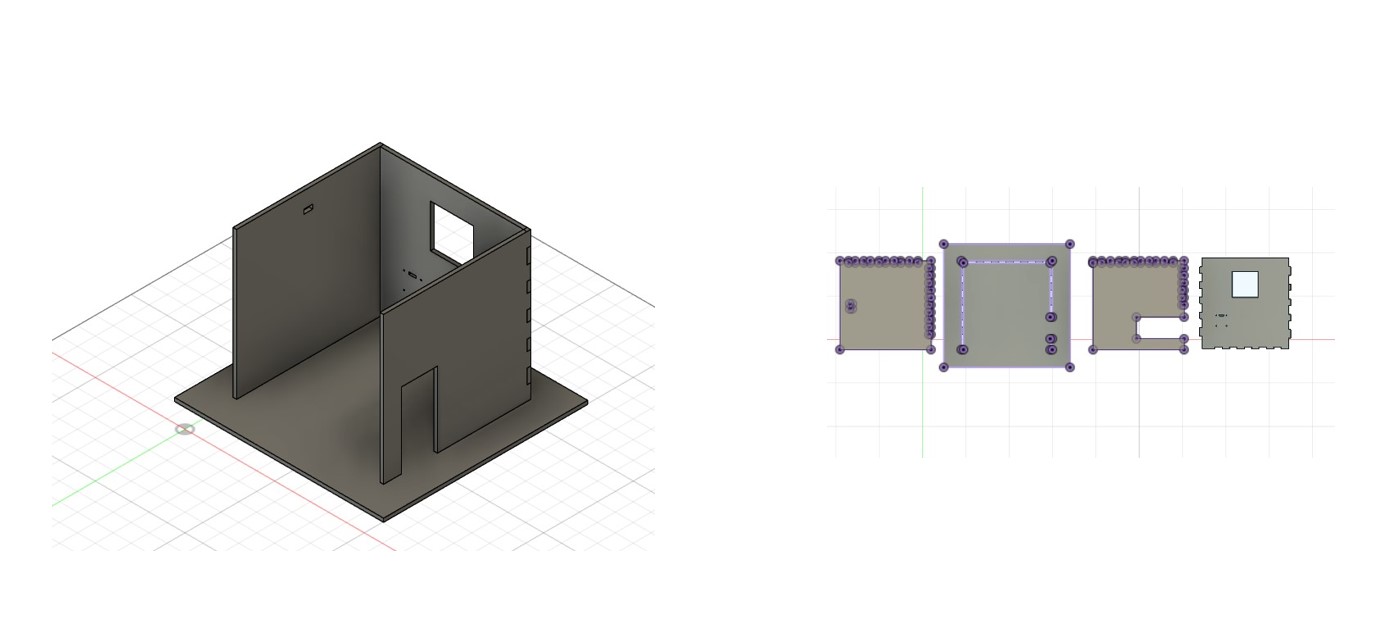
1. Design the Room Model
-
I used Fusion 360 to design a press-fit room model, ensuring the dimensions fit the planned electronics.
-
I exported the design as a DXF file.
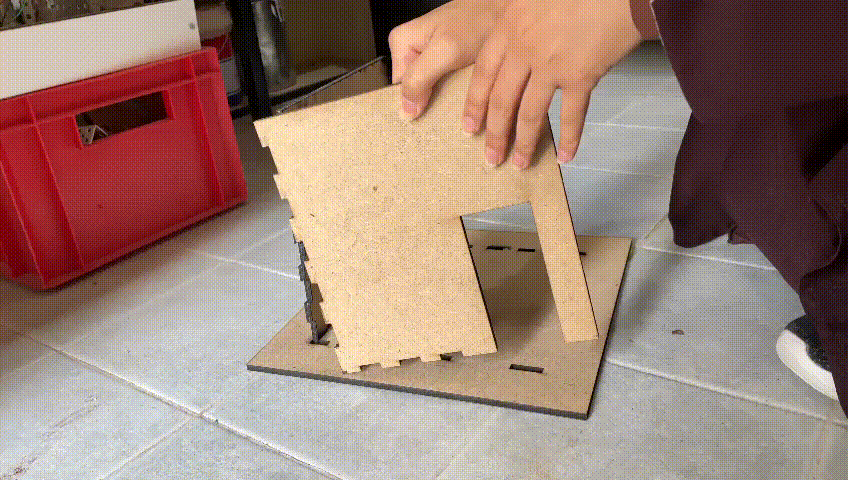
2. Laser Cutting
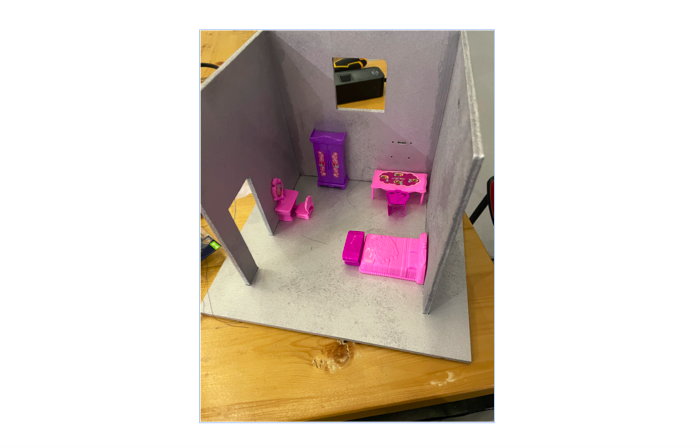
- I cut the room structure from 6mm wood using a laser cutter.

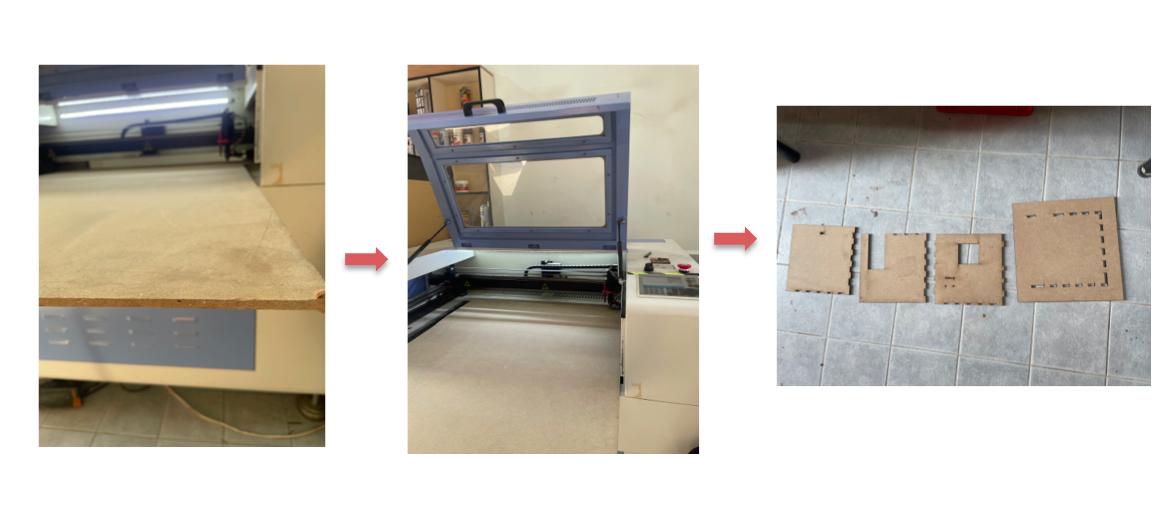
- During assembly, I realized the pieces didn’t fit perfectly the structure was a bit loose. To fix this, I used wood glue to bond the edges and ensured the parts stayed together.

3. Finishing the Room Structure
- I spray-painted the room structure and allowed it to dry.
- I add a 3D-printed furniture to give the room a more realistic appearance.
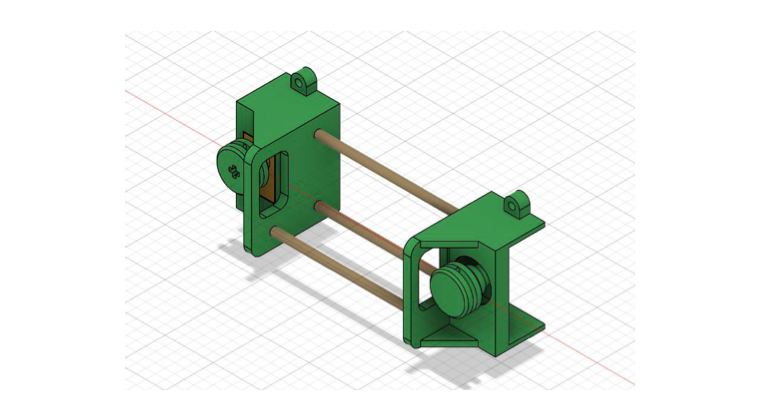
4. Designing a 3D Curtain Components
- By using fusion 360, I designed two pulleys and two hangers to hold the curtain roller, ensuring the design fit the servo motor.
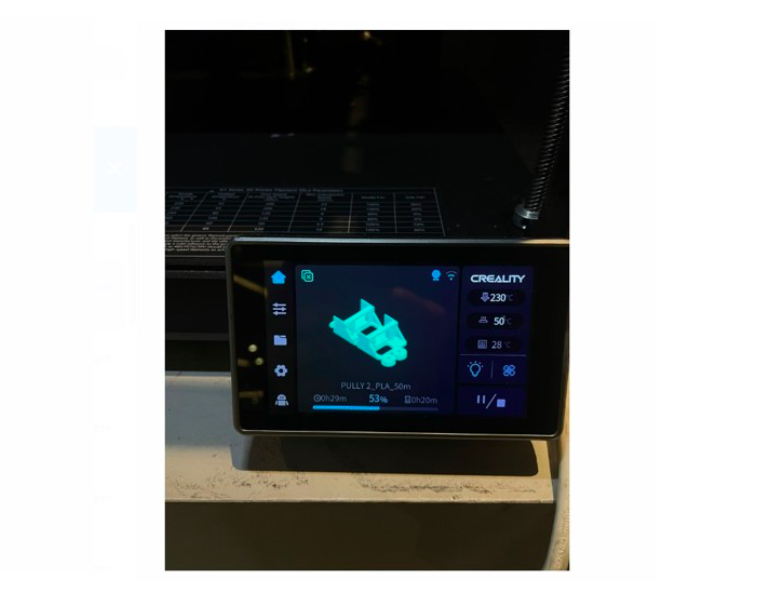
5. 3D Printing the Curtain Parts
- I printed the curtain components using a Creality 3D printer, which took about 30 minutes.
6. Assembling the Curtain System
-
I assembled the curtain system and attached the motor.
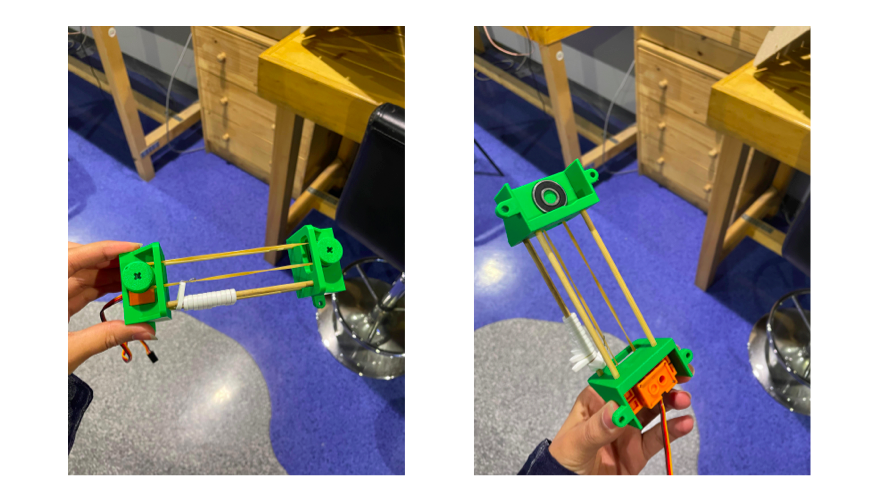
-
I punched the curtain to create circles using paper punch, then added the thread inside.
-
I hung the curtain on the two pulleys and tied the thread tightly so the servo motor could move it easily.
- I stuck the curtain hanger onto the wall in my room using glue gun.
- The mechanism was a little tricky to set up.
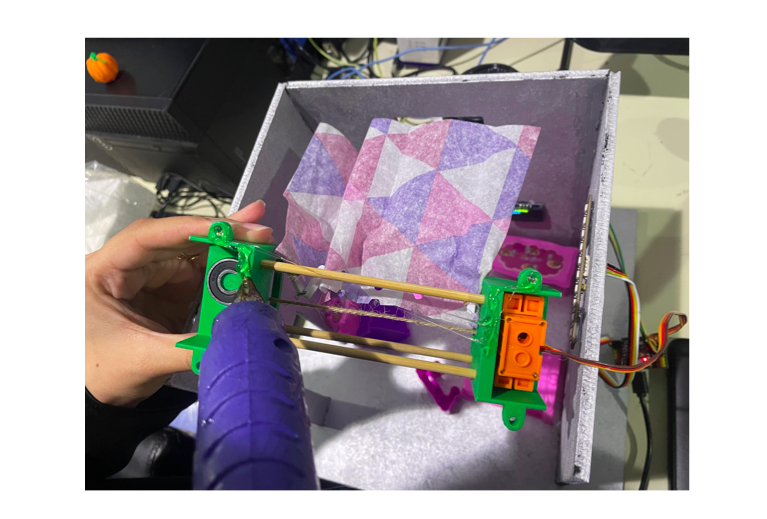
7. Electronics Setup
I used an Arduino Xiao ESP32 to control:
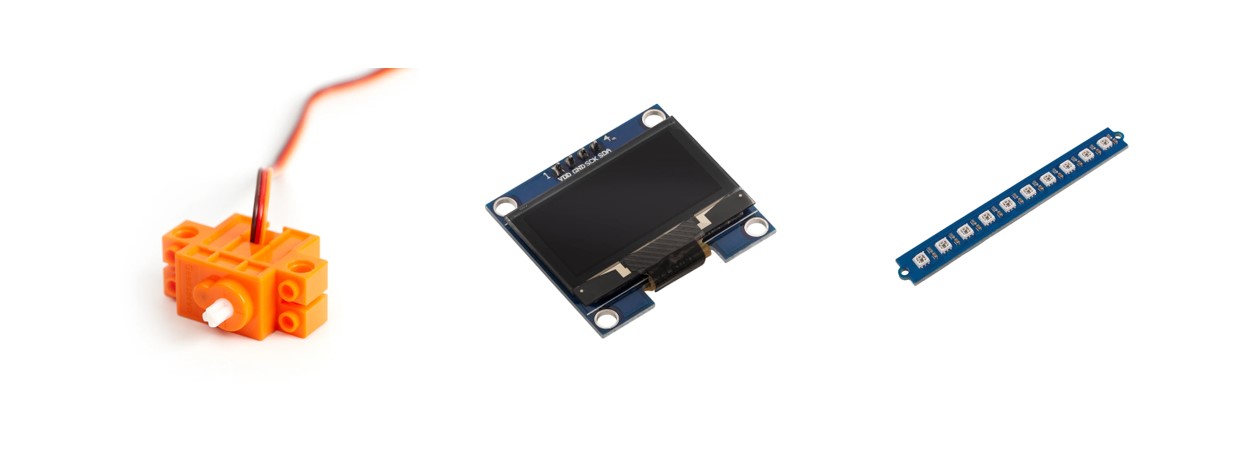
- RGB LED strip lights for room lighting.
- A servo motor to open and close the curtains.
- An OLED screen for displaying real-time information.
After programming the components, I connected my microcontroller (which functions as the receiver) to the same Wi-Fi network as Khalid’s microcontroller (the sender). You can visit his website to see more details about his design and elecronics setup.
Here’s the code for the Wi-Fi setup used to program my microcontroller:
#include  <WiFi.h>
  #include  <WiFiClient.h>
  #include  <WiFiServer.h>
  #include  <ArduinoJson.h>
  #include  <Adafruit_NeoPixel.h>
  #include  "oled.h"
  #include  "serv.h"

  // Define the pin for the NeoPixel data line
  #define LED_PIN 0 // Change this to the GPIO pin you're using
  #define NUM_LEDS 14 // Change this to the number of LEDs in your strip
  Adafruit_NeoPixel strip = Adafruit_NeoPixel(NUM_LEDS, LED_PIN, NEO_GRB + NEO_KHZ800);

  const int   serverPort  = 8080;
  WiFiServer  server(serverPort);
  WiFiClient  client;

//==============================================================
//  SETUP
//==============================================================

  void setup() {

    // Starting Serial
    Serial.begin(115200);
    delay(50);
    Serial.println();

    // OLED Star
    oled_start();
    oled_clear();
    oled_text(2, 0, 0, "Welcome\nTo My\nRoom");

    // Servo Start
    servo_start();
    myservo.write(90);

    // Start LED Strip
    strip.clear();
    strip.show();

    // Starting Access Point Mode
    setupServer("Zubaida", "12345678");

  }

//==============================================================
//  LOOP
//==============================================================

  void loop() {

    handleClient();

    // String x = handleClient();
    // String x = Question("Your JSON Message");
    // parseJson(x);

  }

//==============================================================
//  SERVER
//==============================================================

  void setupServer(const char* _ssid, const char* _password) {
    WiFi.softAP(_ssid, _password);
    IPAddress IP = WiFi.softAPIP();
    Serial.print("AP IP address: ");
    Serial.println(IP);
    server.begin();
  }

//=========================================================
// JSON
//=========================================================

  void parseJson(String Message) {

    // Parse the JSON message
    JsonDocument doc;

    // Break Down JSON
    DeserializationError error = deserializeJson(doc, Message);

    if(error) {
      Serial.print(F("deserializeJson() failed: "));
      Serial.println(error.c_str());
      return;
    }

    // Extract data from the JSON
    String device   = doc["device"];
    String control  = doc["control"];

    if(device == "light") {

      if(control == "on") {
        oled_clear();
        oled_text(2, 0, 0, "Lights\nOn");
        lightControl(255, 255, 255);
      } else if(control == "off") {
        oled_clear();
        oled_text(2, 0, 0, "Lights\nOff");
        strip.clear();
        strip.show();
      } else {}

    } else if(device == "curtain") {

      if(control == "open") {
        // Serial.println(" -> Curtain Is Openning :D");
        oled_clear();
        oled_text(2, 0, 0, "Curtain\nOpen");
        myservo.write(0);
        delay(2000);
        myservo.write(90);
      } else if(control == "close") {
        oled_clear();
        oled_text(2, 0, 0, "Curtain\nClose");
        myservo.write(180);
        delay(2000);
        myservo.write(90);
      } else {}

    } else if(device == "oled") {
      oled_clear();
      oled_text(2, 0, 0, control);
    }

    // Save Memory
    doc.clear();

  }

//=========================================================
// TCP Section
//=========================================================

  void handleClient() {

    // Wait for a client to connect
    WiFiClient client = server.available();

    if(client) {
      Serial.println("Client connected");
      // Read data from client
      while(client.connected()) {
        if(client.available()) {
          String data = client.readStringUntil('\n');
          while(client.available()) { client.read(); }
          data.trim();
          Serial.println("Received data: " + data);
          parseJson(data);
        }
      }
      // Close the connection
      client.stop();
      Serial.println("Client disconnected");
    }

  }

//=========================================================
// NEO PIXEL
//=========================================================

  void lightControl(uint8_t r, uint8_t g, uint8_t b) {
    for(int i=0; i<strip.numPixels(); i++) {
      strip.setPixelColor(i, r, g, b);
    }
    strip.show();
  }

//=========================================================
// Serial Monitor Question
//=========================================================

  String Question(String Message) {

    // Print Message
    Serial.print(Message + " : ");
    while(!Serial.available());

    // Read String Data
    String x = Serial.readStringUntil('\n');

    // Clean Up Every Thing Else
    while(Serial.available()) { Serial.read(); }

    // Clear White Spaces
    x.trim();

    // Print User Input
    Serial.println(x);

    // Return User Input
    return x;

  }
And this is the code for the remote setup of khalid’s microcontroller:
//==============================================================
//  LIBRARIES
//==============================================================

  #include  <WiFi.h>
  #include  <Button.h>
  #include  <ArduinoJson.h>

//--------------------------------------------------------------
//  VARIABLES
//--------------------------------------------------------------

  // Client side
  const char* ssid              = "Zubaida";
  const char* password          = "12345678";
  const char* serverIP          = "192.168.4.1"; // Replace with the actual IP address of the Access Point
  const int   serverPort        = 8080;
  bool        light_prv_state   = false;    // False means off
  bool        curtain_prv_state = false;  // False means off

  // Buttons
  Button      btnLight(1);
  Button      btnCurtain(2);

//==============================================================
//  SETUP
//==============================================================

  void setup() {

    // Starting Serial
    Serial.begin(115200);
    delay(50);
    Serial.println();

    // Start Button Functions
    btnLight.begin();
    btnCurtain.begin();

    // Connecting To Server
    establish_wifi_connection();

  }

//==============================================================
//  LOOP
//==============================================================

  void loop() {

    // Light Button
    if(btnLight.pressed()) {
      if(light_prv_state == false) {
        String x = "{\"device\": \"light\", \"control\": \"on\"}";
        Serial.println(x);
        server_connect(x);
        light_prv_state = true;
      } else if(light_prv_state == true) {
        String x = "{\"device\": \"light\", \"control\": \"off\"}";
        Serial.println(x);
        server_connect(x);
        light_prv_state = false;
      }
      delay(100);
    }

    // Curtain Button
    if(btnCurtain.pressed()) {
      if(curtain_prv_state == false) {
        String y = "{\"device\": \"curtain\", \"control\": \"open\"}";
        Serial.println(y);
        server_connect(y);
        curtain_prv_state = true;
      } else if(curtain_prv_state == true) {
        String y = "{\"device\": \"curtain\", \"control\": \"close\"}";
        Serial.println(y);
        server_connect(y);
        curtain_prv_state = false;
      }
      delay(100);
    }

    // Manually Send Via Serial Monitor
    // manual_send();

  }

//==============================================================
//  FUNCTIONS
//==============================================================
//  Create WiFi Access Point
//--------------------------------------------------------------

  void establish_wifi_connection() {

    WiFi.begin(ssid, password);
    Serial.print("Connecting to Wi-Fi");

    while (WiFi.status() != WL_CONNECTED) {
      delay(500);
      Serial.print(".");
    }

    Serial.println("");
    Serial.println("WiFi connected");
    Serial.print("IP address: ");
    Serial.println(WiFi.localIP());

  }

//--------------------------------------------------------------
//  Connect To Room ESP32C3 Which Is Acting Like A Server
//--------------------------------------------------------------

  void server_connect(String message) {

    // New Client
    WiFiClient client;

    // If Connected Just Skip
    if(client.connected()) { return; }

    // Try To Connect To Server
    while(!client.connect("192.168.4.1", 8080)) {
      Serial.print(" . ");
      delay(200);
    }

    // Print Data If Connected
    client.println(message);

    // Stop Connection
    client.stop();

  }

//--------------------------------------------------------------
//  Question Function For Testing
//--------------------------------------------------------------

  String Question(String Message) {

    // Print Message
    Serial.print(Message + " : ");
    while(!Serial.available());

    // Read String Data
    String x = Serial.readStringUntil('\n');

    // Clean Up Every Thing Else
    while(Serial.available()) { Serial.read(); }

    // Clear White Spaces
    x.trim();

    // Print User Input
    Serial.println(x);

    // Return User Input
    return x;

  }

//--------------------------------------------------------------
//  Question Function For Testing
//--------------------------------------------------------------

  void manual_send() {

    // Prepare the JSON message
    DynamicJsonDocument doc(1024);
    doc["device"]   = Question("Device  ");
    doc["control"]  = Question("Control ");

    // Serialize the JSON message
    String message;
    serializeJson(doc, message);

    // Connecting To Server
    server_connect(message);

  }

//==============================================================
//  END
//==============================================================
8. System Testing
I positioned the electronics in their designated spots within the room and secured them. Then, we tested the system:
-
The dual buttons control the devices in the room. When the system starts, the screen displays “Welcome to my room” Clicking the blue button turns on the lights, and the screen shows “Lights on” Clicking the button again turns off the lights, and the screen changes to “Lights off”.
-
Pressing the red button opens the curtain, with the screen displaying “Curtain open” Clicking it again closes the curtain, and the screen shows “Curtain closed”.
Target Audience
The target audience for this project includes homeowners, tech enthusiasts, and businesses seeking smart automation solutions to enhance both living and working environments.
Future Improvement Plans
It could include:
- Integrating voice control features for easier interaction (e.g., Alexa, Google Assistant).
- Adding more sensors, such as temperature or motion detectors, to expand functionality.
- Increasing compatibility with other smart home ecosystems to broaden the system’s reach and versatility.